
Guide: Google Colab
Welcome! If the words “notebook,” “code cell,” or “runtime” mean nothing to you yet, you are in exactly the right place. This guide walks you from “what is this?” all the way to “I finished the activity and submitted it,” with nothing to install and no coding background assumed. Take it one numbered step at a time. You cannot break anything.
1. What this is and why CIS 350 uses it
Google Colab (short for “Colaboratory”) is a free tool that lets you write and run Python code inside your web browser. There is nothing to download and nothing to set up on your computer. If you can open a web page and sign in to a Google account, you can use Colab.
A Colab document is called a notebook. Think of a notebook like a lab worksheet that can actually do the math for you. It is made of stacked boxes called cells. Some cells hold plain writing (instructions, questions); other cells hold code you can run with one click, and the result appears right underneath. You read top to bottom, running the code boxes in order, just like following a recipe card by card.
Here is the real-world analogy: a normal recipe card only tells you what to do. A Colab notebook is a recipe card with a “cook this step” button on every instruction. You press the button on step 1, watch it happen, then press step 2, and so on. By the end, the dish (your analysis, your chart, your captured flag) is done.
CIS 350 uses Colab for everything hands-on: every lab (Weeks 1-8 and 10-13), the Week 1 Python and Colab tutorial, and every Capture-the-Flag (CTF) challenge starter. We chose it because it is free, it works the same on any laptop, and the powerful data-science tools we need are already built in. You focus on learning, not on installing software.
2. Before you start / first-time setup
You need one thing: a Google account (a Gmail address, or your GW Google account). If you already use Gmail, you are ready. Follow these steps once.
- Open a web browser (Chrome works best) and go to https://colab.research.google.com.
- You will see a blue-and-white welcome window titled “Welcome to Colaboratory.” Look at the top-right corner of the screen for a Sign in button and click it.
- Type your Google email address, click Next, type your password, and click Next again. (If your school account asks for two-step verification, approve it on your phone.)
- You are now signed in. In the top-right corner you should see your account initial or profile picture in a circle. That circle is how you confirm you are logged in.
- To make your very first notebook, click the File menu in the top-left, then click New notebook. A fresh notebook opens in a new tab, with one empty code cell in the middle.
That is the entire setup. Colab automatically saves your notebooks to your Google Drive, so there is no “save file to my computer” step to worry about yet.
3. A guided tour of the interface
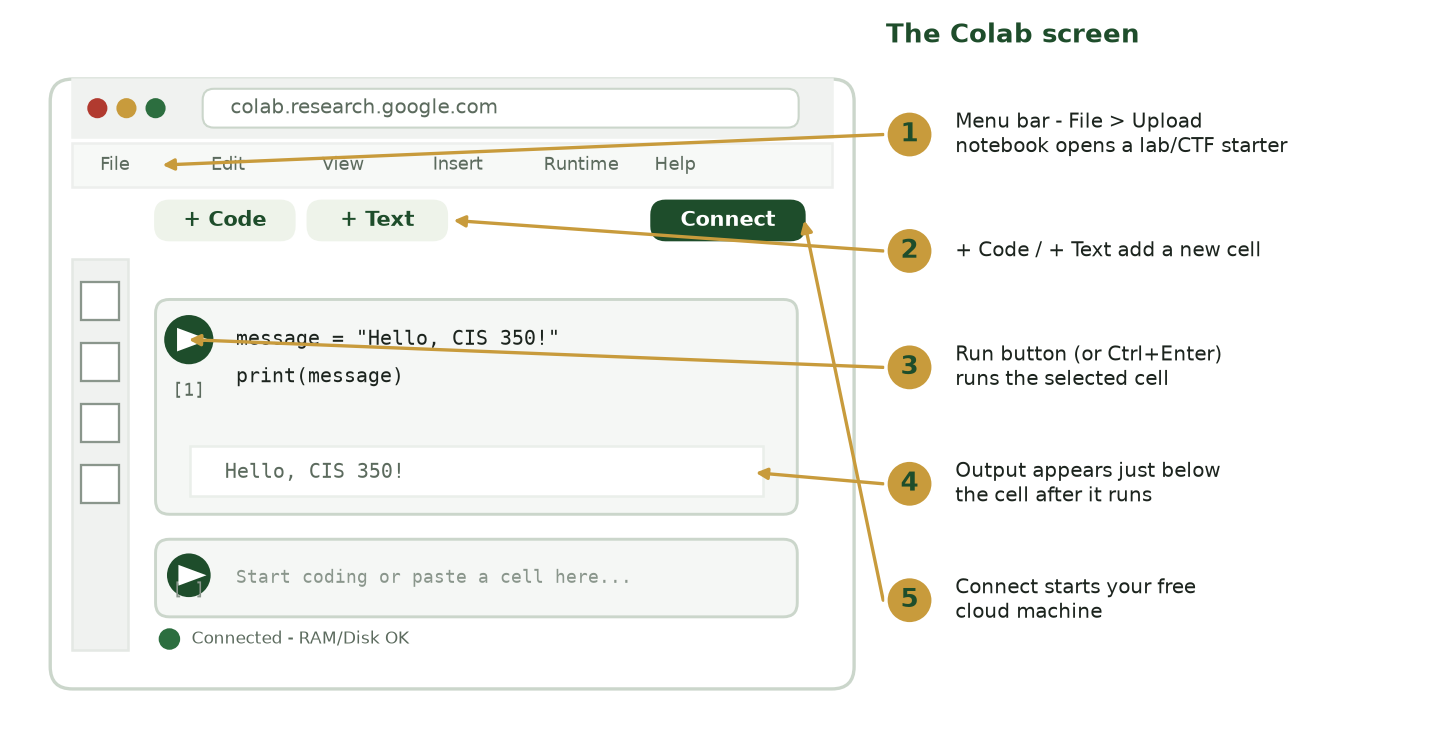
Figure 1. The main Colab screen. This is an illustration to help you find things - the real page may look slightly different, but the labeled parts are always in these areas.
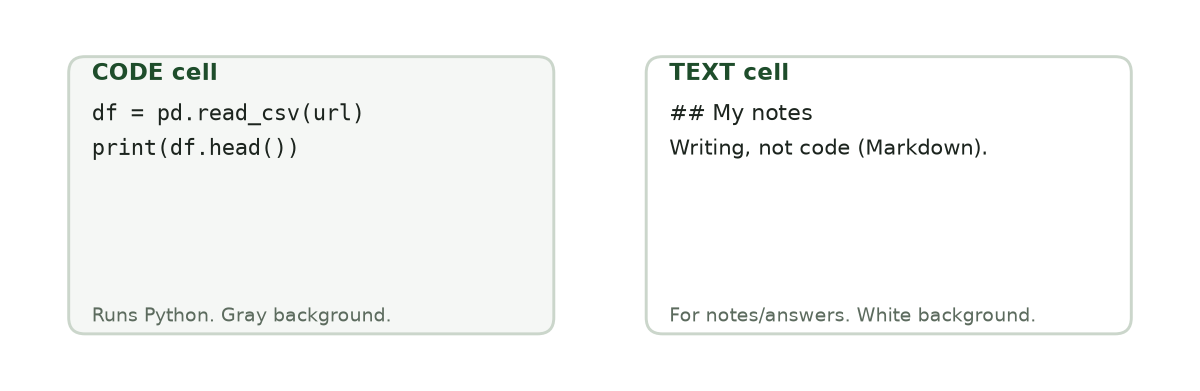
Figure 2. A notebook is a stack of cells. Code cells run Python; text cells hold notes and your written answers.
When a notebook is open, the screen has three main areas. Here is a simple sketch of the layout:
+-----------------------------------------------------------+
|  File  Edit  View  Insert  Runtime  Tools  Help    (menus)|
|  [ + Code ]  [ + Text ]                    (add-cell bar)  |
+-----------------------------------------------------------+
|  (O)  | import pandas as pd                                |  <- a CODE cell
|  Run  | df = pd.read_csv("...")                            |
+-----------------------------------------------------------+
|         This is a text cell explaining the step.          |  <- a TEXT cell
+-----------------------------------------------------------+
Here is what to look for:
- The menu bar (very top): the words File, Edit, View, Insert, Runtime, Tools, Help. You will use File (to upload/download/save) and Runtime (to reset things if they get stuck) the most.
- The +Code and +Text buttons (just below the menus): click + Code to add a new code box, or + Text to add a new writing box. In this course the starter notebooks already have all the cells you need, so you rarely add your own.
- Code cells: grey boxes that hold Python. On the left edge of every code cell is a round Run button - a circle with a triangle “play” symbol inside it. Click it to run that one cell. While it runs the circle spins; when it finishes, any result prints in the white area directly below the cell, and a small number appears in brackets like
[1]to show the order things ran. - Text cells: these look like normal formatted writing (headings, paragraphs, questions). They do not run; they are there to guide you. Double-clicking one lets you edit it, which is how you type answers to the guided questions in a lab.
- The file name (top-left, next to the Colab logo): it starts as something like
Untitled0.ipynb. Click it to rename it (covered next).
The single most important habit: run the code cells in order, from top to bottom. Later cells depend on earlier ones having run first.
4. How you will use it in this course
Almost everything hands-on happens in Colab. You will mostly open a starter notebook we provide, fill in the blanks marked TODO, run the cells, answer a few questions in text cells, and submit the finished notebook. Here is the map:
| Week(s) | What you use Colab for | What you do | How you submit |
|---|---|---|---|
| 1 | Python & Colab tutorial (Activity 1) | Work through a gentle intro: run cells, learn just-enough Python | Follow along; no upload needed unless your instructor asks |
| 1-8, 10-13 | The 12 graded Labs (50 pts each) | Open the lab starter.ipynb, fill the TODO blanks, answer 5 guided questions |
Download the completed .ipynb and upload it in Canvas |
| 8 | CTF: Evade the Filter (15 pts) | Modify a phishing email so a classifier scores it benign | Run the check cell, submit the CIS350{...} flag on CTFd |
| 10 | CTF: One Pixel Too Far (20 pts) | Add a tiny perturbation so a model misreads a digit | Submit the flag on CTFd |
| 11 | CTF: Jailbreak the Helpdesk Bot (20 pts) | Craft a prompt injection that makes a bot leak its secret | Submit the flag on CTFd |
| 13 | CTF: Were You in the Data (20 pts) | Run a membership-inference attack | Submit the flag on CTFd |
| 15 | CTF: The Aging Malware Detector (20 pts) | Fine-tune a stale detector with limited labels | Submit the flag on CTFd |
For the full picture of weekly work, see the Activities page and the Labs page. Brand-new to all of this? Start with the Python & Colab Bootcamp slides linked at the top of the Labs page before Lab 1.
.ipynb file in Canvas. CTF challenges are submitted as a short CIS350{...} flag on the CTFd server. The notebook is how you *get* the flag; CTFd is where you *turn it in*.
5. Step-by-step: completing an activity end to end
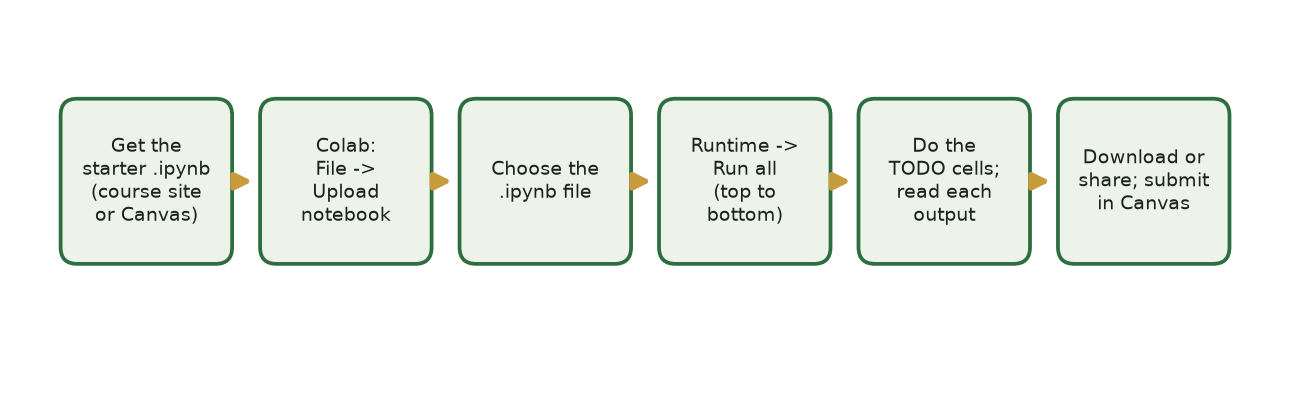
Figure 3. The same six steps work for every lab and every CTF starter notebook.
The one step new students hunt for is where to open the starter file. It lives in the File menu at the top-left: click File, then Upload notebook (highlighted below).
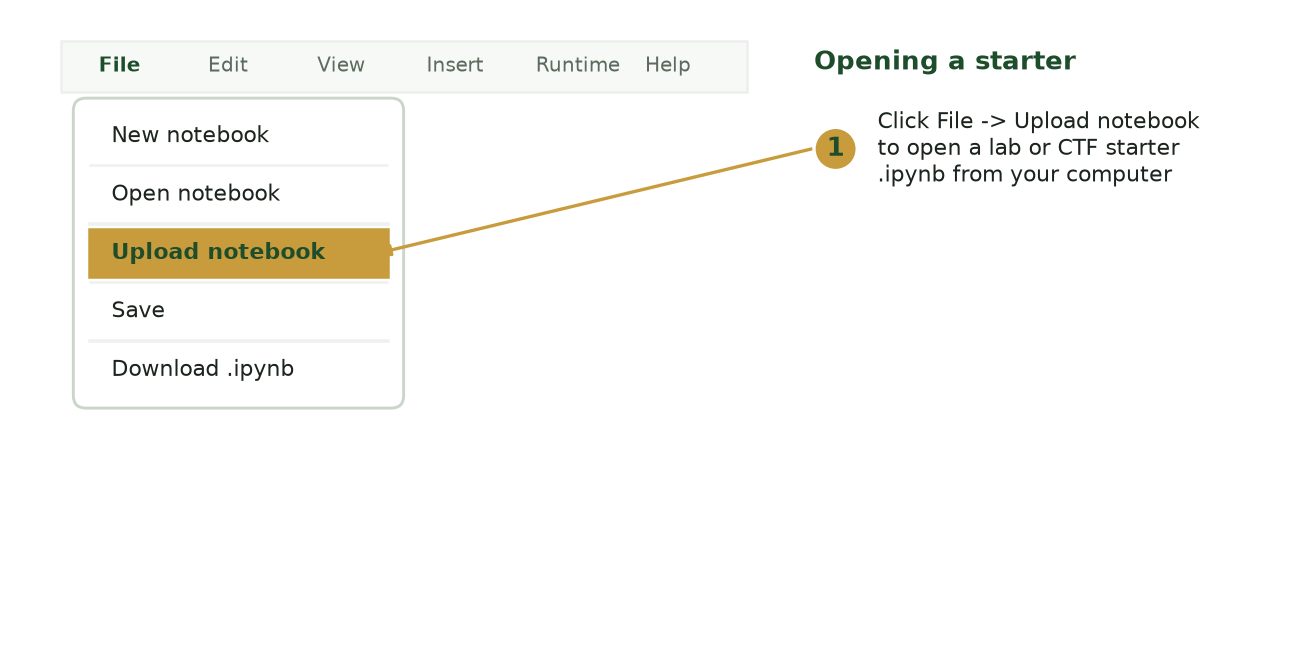
Figure 4. Opening a starter notebook: File -> Upload notebook. Illustration - your screen may differ slightly.
Let’s walk through a typical lab (for example, Lab 2 - Exploring Security Data, where you analyze a phishing-email dataset). Every lab and CTF starter follows this same rhythm.
- Get the starter file. Download the lab’s
starter.ipynbfrom Canvas (or the link on the course site) to your computer. You will see a file ending in.ipynb- that is a notebook file. You do not need to open it on your computer. - Open Colab and upload it. Go to https://colab.research.google.com, sign in, then click File -> Upload notebook. In the window that appears, click Browse, choose the
starter.ipynbyou just downloaded, and it opens in Colab. - Rename it so it is clearly yours. Click the file name at the top-left (e.g.
starter.ipynb) and change it to something likeLab02_YourName.ipynb. Press Enter. - Read the top text cell. The first cell explains the task. Read it before touching anything.
-
Run the setup cell. The first code cell usually loads the tools and the data. Click the round Run button on its left edge (or click inside the cell and press Ctrl+Enter). Wait for the spinning circle to stop and a
[1]to appear. A common first cell looks like this:import pandas as pd df = pd.read_csv("https://example.com/emails.csv") # the real URL is in your starter df.head()pd.read_csv(...)loads a spreadsheet-style file from a web address into a table called a DataFrame (we nickname itdf).df.head()then prints the first five rows so you can see what you are working with. - Work down the notebook, one cell at a time, in order. Fill in any blank marked
# TODOby typing the small piece of code the instructions ask for, then run that cell. Helpful commands you will see:df.shape- tells you how many rows and columns the table has.df.describe()- prints quick statistics (averages, min, max) for the number columns.df["label"].value_counts()- counts how many emails are phishing vs. legitimate.
-
Make the chart. Many labs ask for a simple bar chart. The starter gives you most of it; you run the cell and a plot appears right below it, for example:
import matplotlib.pyplot as plt df["label"].value_counts().plot(kind="bar") plt.show() - Answer the guided questions. Scroll to the text cells that ask questions. Double-click one, type your answer under the question, then click anywhere outside the cell to lock it in.
- Do a clean final run. Click the Runtime menu -> Restart and run all. This clears everything and runs the whole notebook fresh from the top, proving your work runs start-to-finish without errors. Watch it complete with no red error boxes.
- Save (it is automatic). Colab saves to your Google Drive every few seconds - you will see “All changes saved” near the top. To force a save at any time, press Ctrl+S or use File -> Save. Your notebooks live in a Drive folder called “Colab Notebooks,” so there is no “save to my computer” step to worry about.
- Download the finished notebook. Click File -> Download -> Download .ipynb. Your browser saves one file ending in
.ipynbto your Downloads folder - it contains all your code, results, charts, and answers. This single file is what you submit for a lab. - Submit it in Canvas. Open your course in Canvas ([your Canvas course URL - posted on Canvas]) and open the correct lab assignment. Click Start Assignment, choose File Upload, click Choose File (or Browse), and select the
.ipynbyou just downloaded. Confirm the file name is your lab (e.g.Lab02_YourName.ipynb), then click Submit Assignment. You should see a confirmation and the submission time.
For a CTF challenge the flow is the same until step 8: instead of answering questions in text cells, you run the final check(...) cell. When it prints SUCCESS! Flag: CIS350{...}, copy the whole flag, go to the course CTFd server ([your course CTFd URL - posted on Canvas]), open that week’s challenge, paste the flag into the answer box, and click Submit. A green “Correct” means you earned the points. For CTFs you submit the flag on CTFd, not the notebook - though you may also record your code and reflection in that week’s worksheet if the activity asks.
.ipynb to Canvas rather than sharing a link, unless your instructor says otherwise.
6. Troubleshooting
Errors are normal and expected - even professionals hit them constantly. When something goes wrong, Colab prints a red box under the cell. Read the last line of that red box; it names the problem. Here are the five you are most likely to meet and the exact fix for each.
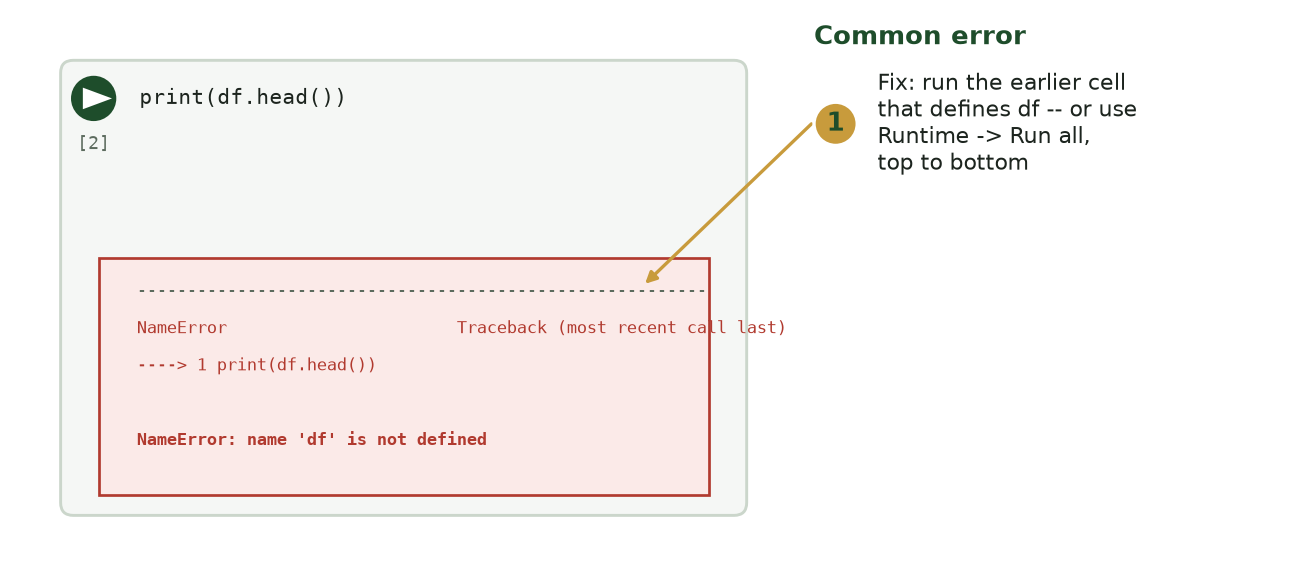
Figure 5. A typical red error box and its fix - run the earlier cell that defines the variable. Illustration - your screen may differ slightly.
| What you see (in the red box) | What it means | The exact fix |
|---|---|---|
NameError: name 'df' is not defined |
You tried to use something before creating it - usually you skipped an earlier cell. | Scroll up and run the earlier cell (the one that defines df) first, then re-run this one. Easiest: Runtime -> Restart and run all. |
ModuleNotFoundError: No module named '...' |
The code used a tool that was never brought in. | Add the missing import at the top, e.g. import pandas as pd or import matplotlib.pyplot as plt, and run that cell. (Note: pandas, numpy, scikit-learn, and matplotlib are already installed - you never need pip install for these.) |
FileNotFoundError or an HTTP error on read_csv |
The web address (URL) for the data is mistyped or the file moved. | Check the URL inside pd.read_csv("...") matches the one in the instructions exactly - watch for missing quotes or a truncated link. |
IndentationError |
A line of code has the wrong amount of space at its start. | Lines inside a block must be indented consistently. Line up your line with the others around it (use spaces, not random tabs). |
| Cells behaving oddly, wrong numbers, or “it worked before and now doesn’t” | You ran cells out of order and the notebook is confused. | Click Runtime -> Restart session (or Restart and run all) to wipe everything clean and start fresh from the top. |
A few more quick answers:
- “My code cell has no Run button.” You are probably hovering over a text cell. Text cells have no play button; only grey code cells do.
- “It says I need to reconnect / the runtime disconnected.” Colab disconnects after long idle time. Click Reconnect at the top-right, then Runtime -> Run all. Your typed code is safe; only the running results were cleared.
- “Where did my work go?” It is saved in Google Drive automatically (Colab auto-saves every few seconds; see step 10 in Section 5). Reopen it from https://colab.research.google.com under the “Recent” tab.
7. Ethics and responsible use
- Practice only in the sandbox we provide. The only thing you are authorized to test is the notebook in front of you. Never point these techniques at any real website, account, model, or system you do not own or are not explicitly authorized to test - doing so is illegal and a violation of the course academic-integrity policy.
- Do your own work. AI assistants (ChatGPT, Claude, Copilot, and the like) are not permitted for labs and quizzes; your code and answers must be your own. When a group of two is allowed, both members must contribute to and understand all of the work.
- The point is defense. You try an attack once, safely, so you can recognize and stop it in the real world. That understanding - not the flag or the score - is what the course is really after.
8. Getting help + quick-reference checklist
Where to get help, in order:
- Re-read the red error box’s last line and check the Troubleshooting table above.
- Try Runtime -> Restart and run all.
- Post your question on the course discussion board or in office hours - paste the exact red error text so we can help fast.
- Review the Python & Colab Bootcamp slides linked on the Labs page.
Before any hands-on security activity, re-read the ethics and responsible-use rules in Section 7 above.
Quick-reference checklist - glance at this during any activity:
- Signed in to Colab with my Google account (profile circle shows top-right).
- Opened the starter via File -> Upload notebook.
- Renamed the notebook to include my name.
- Ran every code cell in order, top to bottom (Run button or Ctrl+Enter).
- Filled in every
# TODOblank. - Answered all guided questions in the text cells.
- Did a clean Runtime -> Restart and run all with no red errors.
- Lab: File -> Download -> Download .ipynb, then uploaded it in Canvas.
- CTF: copied the
CIS350{...}flag and submitted it on CTFd.
You have got this. Work through it one cell at a time, and remember: restarting the runtime fixes most surprises.