
Guide: CISA Tabletop Exercises
Welcome! If you just read the words “incident response” and felt a small wave of panic - relax. This is the friendliest, lowest-tech activity in the whole course. There is no software to install, no code to write, and nothing you can break. You will sit with a few classmates, read a short story about something going wrong, and talk through what a real company should do. That is genuinely the whole thing. This guide takes you from “what is a tabletop?” all the way to “we submitted our worksheet,” one step at a time.
1. What this is and why CIS 350 uses it
A tabletop exercise is a guided, discussion-based practice drill for a crisis. A scenario unfolds on paper - “a reporter just published a story that our AI is biased” - and a small team talks through the decisions they would make, out loud and in writing. No computers are attacked. No systems are touched. You are rehearsing the thinking and the conversation, not typing commands.
Here is the real-world analogy: it is a fire drill for a company’s decision-makers. In a fire drill nobody lights an actual fire; you practice walking calmly to the exits so that if a real fire ever happens, your body already knows what to do. A tabletop is the same idea for a cyber or AI emergency. You practice the hard call - “do we shut the system off? who do we tell first? what do we say?” - in a safe room, so it is not the first time you have thought about it when the pressure is real.
Our tabletops are modeled on the free, professionally-designed CISA Tabletop Exercise Packages published by the U.S. Cybersecurity and Infrastructure Security Agency - the same format real security teams, hospitals, and governments use to train. CISA is a U.S. government agency, and “tabletop” just means everyone gathered around a table talking, so you will sometimes hear these called “CISA-style tabletops.”
CIS 350 uses them because the hardest parts of security and AI are not technical - they are judgment calls under pressure with money, trust, and fairness all on the line. There is rarely one “correct” answer. What matters is that you can reason clearly (weigh risk, cost, and evidence) and communicate clearly (tell your boss and your customers what is happening in plain language). Those are exactly the skills a business graduate brings to a room full of engineers, and they are exactly what these exercises grow.
2. Before you start / first-time setup
Good news: there is no account to create and nothing to download to your own computer. The “setup” is just getting the two files your team needs and knowing where you will be. Do this once, before class.
- Open your web browser and sign in to Canvas at [your course Canvas URL - posted on Canvas / the syllabus]. This is where the week’s materials live.
- Go to the week’s lecture-notes page (for example, “Week 4”). Each tabletop week has two downloads: a slide deck (a
.pptxPowerPoint that sets up the story) and a student worksheet (a.pdfyour team fills in). You can also reach these from the Weekly Activities page. - Click the worksheet PDF to download it. You will see a title like “Week 4 Activity: Cost-Benefit Trade-Off Under Pressure - Team Worksheet.” Skim it once so nothing is a surprise. One printed or shared copy per team is enough - it is a team worksheet, not one-per-person.
- Optional but recommended: spend two minutes on the CISA Tabletop Exercise Packages page so you recognize the format. Some weeks also point you to a short government reference (for example, the NIST incident-handling guide in Week 14). You do not need to read these cover to cover - a skim is plenty.
- Show up to class ready to form a small group of 3 to 5 students. Bring a pen (to write on a printed worksheet) or a laptop (to type into a shared copy). That is it - you are set up.
3. A guided tour of the “interface”
The “interface” here is your team’s worksheet plus the slide deck the instructor shows on the classroom screen. There is no app. Every tabletop worksheet in this course follows the same layout, so once you have seen one you have seen them all. Here is the shape of it:
+-----------------------------------------------------------+
|  TITLE: Week N Activity - [Scenario Name]                 |
|  Team members: ______   Group size: 3-5                   |
+-----------------------------------------------------------+
|  ACTIVITY OVERVIEW  - the story so far                    |
|  ROLES TABLE        - who plays which part (fill names)   |
|  DECISION FRAMEWORK - Risk / Cost / Evidence / Reversible |
+-----------------------------------------------------------+
|  WARM-UP: your gut prediction (2 min)                     |
|  ROUND 1: first call        -> decision + justification   |
|  ROUND 2: a COMPLICATION    -> revised decision + why     |
|  ROUND 3: fix + documents   -> message + audit note       |
+-----------------------------------------------------------+
|  DEBRIEF QUESTIONS (answered as a team)                   |
|  GRADING RUBRIC + HOW TO SUBMIT                            |
+-----------------------------------------------------------+
Here is what to look for on the page:
- The Roles table (near the top): a small table with a blank next to each role. Write a teammate’s name in each blank. In a group of three or four, one person can hold two roles.
- The Decision Framework box: four words you will use over and over - Risk (worst case if we act, or if we do not), Cost (money, time, trust, legal exposure), Evidence (what we actually know vs. what we are guessing), and Reversibility (can we undo this later?). This is your thinking checklist for every decision.
- The three Round sections: each has a “Situation,” a list of options to weigh, a blank for your team decision, and a bigger blank for your justification. Round 2 always introduces a complication - new bad news that may change your mind.
- The write-up blanks near the end of Round 3: a stakeholder message (what you tell your boss, customers, or the press) and an audit note / decision log (the paper trail an investigator would read later).
- The Debrief questions: short questions you answer together after the rounds, connecting the drill back to the week’s lecture and lab.
No matter which week you are in, everything your team writes down falls into just four kinds of entry. If you keep these four in mind, the worksheet stops looking like a form and starts looking like a checklist for good decisions: the decision itself, the justification behind it, the stakeholder message you would send, and the audit note that records it for later.
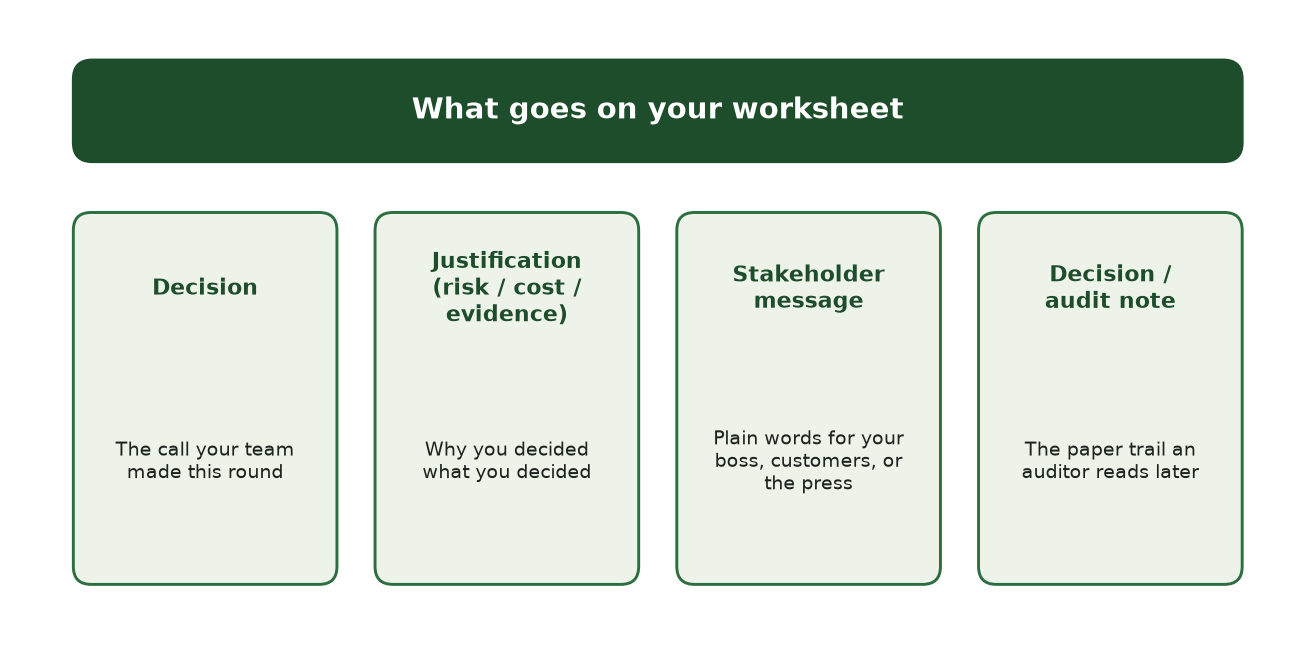
Figure 1. The four kinds of entry every tabletop worksheet asks you to fill in. Illustration - your screen may differ slightly.
The roles a beginner will look for
Every team splits into these roles. You do not need any special knowledge to play any of them - the worksheet tells you what your job is.
| Role | What this person does |
|---|---|
| Incident Commander | Runs the room and the clock; makes the final call when the team is split. The “captain.” |
| Tech Lead | Speaks for the model and the data: what can be turned off, what is technically possible. |
| Comms Lead | Drafts the messages - to your boss, to customers, to the press. |
| Legal / Compliance | Flags legal risk: discrimination law, privacy rules, who must be notified. |
| Scribe | Writes down every decision and the reason for it. This becomes your audit trail. |
Think of the scenario as the thing in the middle of the table and each role as a person leaning in from one side, each responsible for a different angle on the same problem. The Incident Commander keeps everyone moving, the Tech Lead speaks for the system, the Comms Lead handles what the outside world hears, and Legal / Compliance watches the rules. The Scribe (not shown below) sits beside the Commander capturing every call.
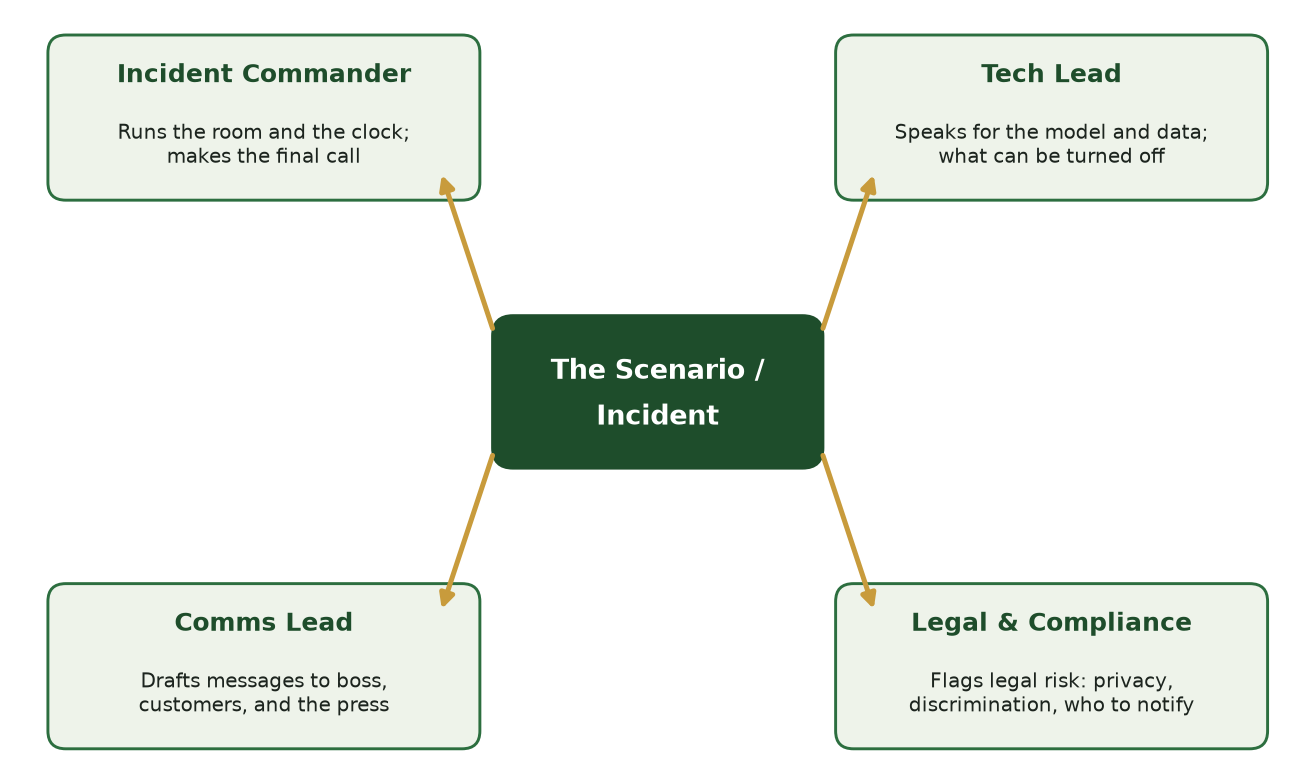
Figure 2. The four core roles all point at the same shared scenario. Illustration - your screen may differ slightly.
4. How you will use it in this course
Six weeks use a CISA tabletop. Each one is a 20-point in-class activity that runs about 30-40 minutes, connects to that week’s lecture and lab, and is submitted the same way: one completed team worksheet PDF, uploaded to Canvas. Here is the full map.
| Week | Lecture theme | Tabletop scenario | What your team does |
|---|---|---|---|
| 4 | Model evaluation and thresholds | Cost-Benefit Trade-Off Under Pressure - a system flags a high-risk IP; a false alarm costs $100, a missed breach costs $50,000 | Decide whether to block, justify it in dollars, and write an audit note for the threshold choice |
| 5 | Unsupervised learning / anomaly detection | Anomaly Detector False Alarms - a detector flags ~100 sessions a day, mostly harmless, and you are only three analysts | Decide what to do with the flood of alerts, whether to auto-block, and how to measure if it actually helps |
| 7 | Semi-supervised and weak labels | When to Request Manual Labels - a bank’s fraud AI is failing; pay $10K for 2 weeks of manual labels, or use fast-but-noisy weak labels | Choose a path, then react when the cheap labels turn out to be biased against real customers |
| 12 | AI ethics, bias, fairness | Fairness Audit Response - an audit finds a hiring model rejects women at twice the rate of men | Decide whether to keep, pause, or fix the model, and name the governance gap that let it ship |
| 14 | Trustworthy and responsible AI | AI Incident Response: Biased Hiring - a news story breaks that a live hiring model downranks women; a client threatens a $2M cancellation | Run the full Detect -> Contain -> Eradicate -> Recover cycle and produce a decision log and post-incident review |
| 16 | Course finale: responsible AI governance | Responsible AI Governance Board - approve exactly one of three models (high-accuracy, privacy-preserving, or explainable) or approve none | Vote as a board, justify with responsible-AI principles, and mandate ongoing monitoring |
You can see this same list on the Weekly Activities page, which also covers the CTFd, Hacker101, and Packback activities in the other weeks.
5. Step-by-step: completing an activity end to end
Let us walk through one representative tabletop from open to submit, using Week 4: Cost-Benefit Trade-Off Under Pressure. Every other week follows the same eight beats. The activity always runs on the same short timeline: a scenario briefing, three quick rounds of roughly five minutes each, and a debrief. The one beat to watch for is Round 2, where the instructor injects a complication - a piece of new bad news designed to make you rethink the call you made in Round 1.
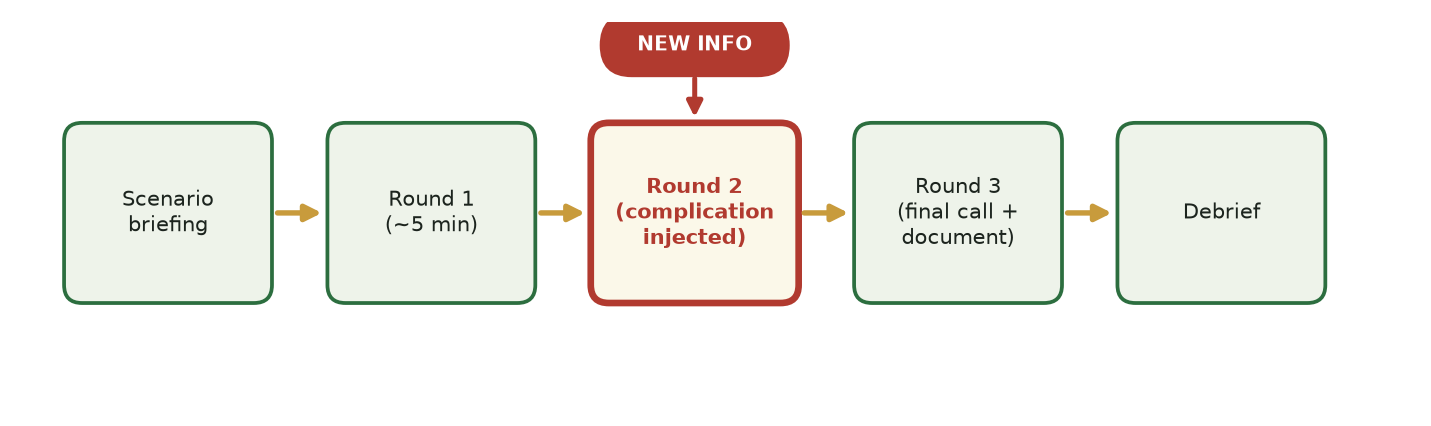
Figure 3. The rhythm of every tabletop; Round 2 (the complication) is where reasoning points are won. Illustration - your screen may differ slightly.
- Form your team and open the worksheet. Gather 3-5 people. Open the Week 4 worksheet PDF you downloaded. Write everyone’s name at the top - the grader checks that all members participated.
- Assign roles. Fill in the roles table: pick an Incident Commander, Tech Lead, Comms Lead, Legal/Compliance, and Scribe. If you have four people, someone doubles up. Do this fast - one minute.
- Read the scenario briefing together. The overview sets the scene: a detection system has flagged a high-risk IP address. The cost model is spelled out - a false positive (blocking a real customer) costs $100; a false negative (missing a real attack) costs $50,000. Read it out loud so the whole team shares the same facts.
- Do the warm-up prediction. Before debating, each person jots a gut call. This is not graded for being “right” - it just gives you a starting point to compare against later.
- Play Round 1 (about 5 minutes). The situation: block the IP or let it through? Talk it out, then record your team decision and, crucially, your justification. Use the framework: the risk of missing an attack ($50,000) dwarfs the risk of a false alarm ($100), so blocking is defensible. Say why in dollars - for example, “one missed attack equals about 500 wrongly-blocked customers, so we block.” The Scribe writes this down.
- Play Round 2 - the complication (about 5 minutes). New information is injected: a data scientist says the team can lower the threshold to catch 99% of attacks, but it will also block 10% of real users. Now re-decide. The key move here is naming what changed: did the new evidence raise the chance of an attack, or the cost of blocking, or both? Record the revised decision and the trigger that moved you.
- Play Round 3 - decide and document (about 5 minutes). Now you produce the two written artifacts:
- A stakeholder message: 3-4 plain-language sentences a non-technical VP can act on. State the decision, the dollar rationale, and the risk you are accepting. Example skeleton: “We are blocking the flagged IP. A missed attack would cost roughly $50,000 versus $100 per false alarm, so the math favors blocking. We accept that a small number of legitimate users may be inconvenienced and have asked support to fast-track any complaints.”
- An audit note: the record an auditor reads six months later. It must contain all four items - (a) the decision and when it was made, (b) the dollar reason, (c) the specific accepted risk, and (d) who approved it (a name).
- Answer the debrief and submit. As a team, answer the debrief questions (they tie back to the Week 4 lab on threshold tuning). Double-check every name is on page one. Then one teammate uploads the completed PDF to Canvas before the deadline. Done.
Here is what a strong, full-credit entry looks like when it is filled in. Notice that every field is short, plain, and paired with a concrete reason - the decision names a specific action, the justification puts the trade-off in dollars, the stakeholder message is something a non-technical manager could act on, and the audit note lists exactly what an investigator would need.
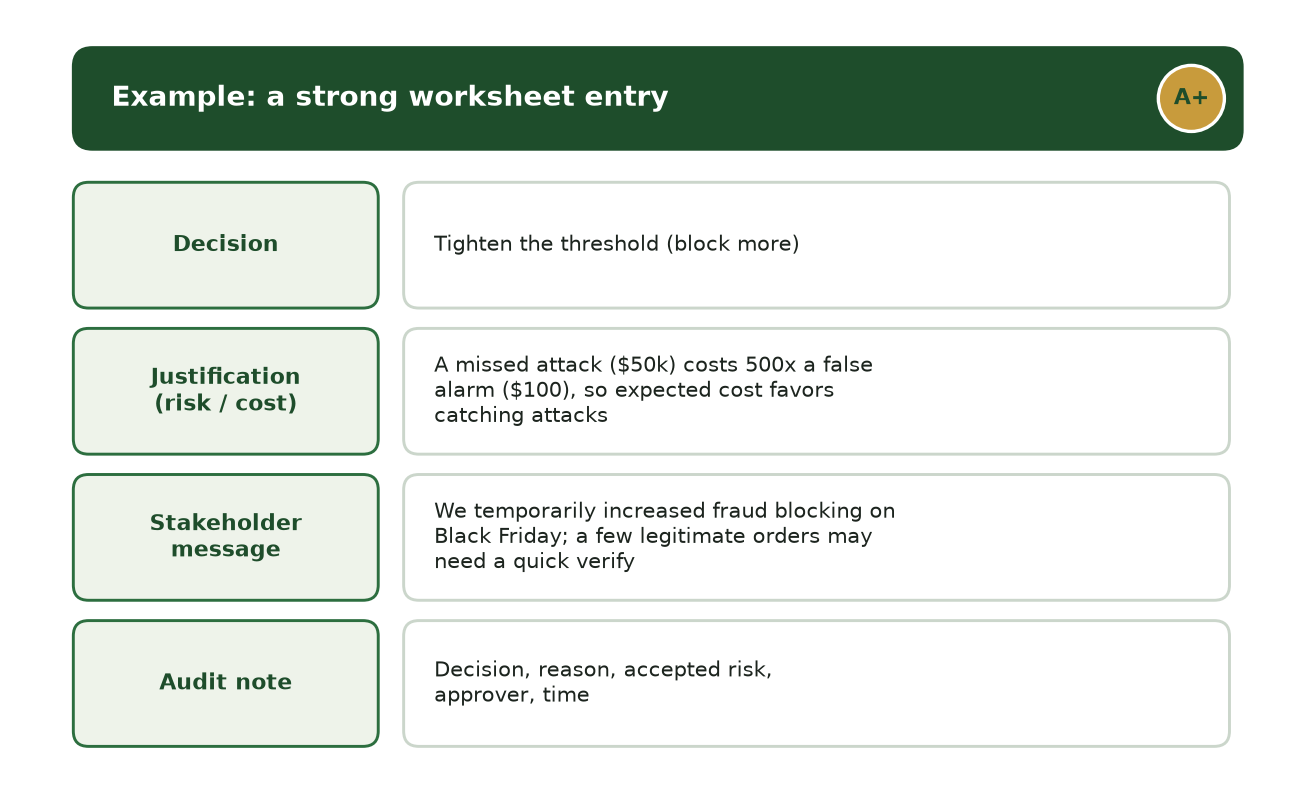
Figure 4. A worked example of a strong worksheet entry for one round. Illustration - your screen may differ slightly.
6. Troubleshooting
| Problem | The fix |
|---|---|
| “We can’t agree on what to do.” | That is normal and fine - the exercise has no single right answer. The Incident Commander makes the call, and the Scribe records the disagreement. A noted trade-off (“we chose X over Y because…”) scores better than fake unanimity. |
| “We’re out of time on a round.” | Rounds are meant to feel rushed - that is the point. Record your best current decision and a one-line reason, then move on. An incomplete-but-justified answer beats a blank you never reached. |
| “Nobody wants to be Incident Commander.” | The role just means keeping the group moving and making the final call when you are split. Rotate it, or give it to whoever is most comfortable talking. It is not extra work after class. |
| “Our group only has 3 people.” | Combine roles: one person can be Incident Commander + Scribe, another Tech Lead + Comms, etc. The worksheet expects groups of 3-5 and says so. |
| “I don’t understand a technical term in the scenario (threshold, false positive, bias).” | You do not need deep technical knowledge. The worksheet defines what matters, and this is where your Tech Lead and the week’s lecture help. Ask a plain-language question out loud - explaining it simply is a graded skill, not a weakness. |
| “We wrote our decisions but the justification blanks are thin.” | Go back and add Risk / Cost / Evidence to each. This is the single biggest point-loser. One sentence per decision naming the risk, the cost, and what you actually know is enough. |
| “Do we each submit, or just one of us?” | One team submits one PDF. Make sure everyone’s name is on the first page so all members get credit. |
| “I missed class - can I still do it?” | Ask your instructor on Canvas. Some weeks allow a written make-up; the worksheet is designed so the scenario is self-contained. |
7. How you are graded
Tabletops have no single correct answer. You are not graded on guessing what the instructor “wanted.” You earn credit for the quality of your reasoning and the clarity of your communication. Every tabletop uses the same 20-point rubric:
| Criterion | Points | What earns full credit |
|---|---|---|
| Completion | 8 | Roles assigned; your team participates in all 3 rounds; a decision is recorded for every round plus the debrief; everyone’s name is listed |
| Reasoning | 7 | Every decision is justified with risk, cost, and evidence (in dollars or concrete terms where the scenario gives them); Round 2 clearly shows how the new information changed your thinking |
| Communication | 5 | A clear, plain-language stakeholder message and an audit note / decision log that records the decision, the reason, the accepted risk, and the approver |
What this means in practice:
- A confident guess with no reasoning scores low. A well-reasoned decision you can defend scores high - even if the team next to you chose the opposite.
- Avoid the “accuracy trap.” Defending a choice with “the model is 95% accurate” is weak, because accuracy hides which error you make. Talk about the cost of each kind of mistake instead.
- Round 2 is where reasoning points are won or lost. If your Round 2 decision is identical to Round 1 with no explanation of the new complication, you leave points on the table. Name what changed.
- Your written artifacts must be usable. An audit note missing the approver’s name, or a stakeholder message drowning in jargon, costs communication points. Write like a real person would need to act on it.
8. Getting help and a quick-reference checklist
Where to get help: ask your instructor or a TA on the course Canvas [your course Canvas URL - posted on Canvas] discussion forum, or in office hours. During the activity itself, your best resource is your own team - talking it through out loud is the exercise. For the format, the CISA Tabletop Exercise Packages page shows how professionals run these. For what a given week asks, see the Weekly Activities page.
Quick-reference checklist - glance at this during the activity:
- All team members’ names are on the worksheet
- Roles assigned (Incident Commander, Tech Lead, Comms Lead, Legal/Compliance, Scribe)
- Everyone read the scenario briefing and agreed on the facts
- Round 1: decision recorded and justified (risk / cost / evidence)
- Round 2: reacted to the complication; wrote down what changed
- Round 3: stakeholder message written in plain language
- Round 3: audit note has decision, reason, accepted risk, and an approver’s name
- Debrief questions answered as a team
- One teammate uploaded the completed PDF to Canvas before the deadline
You have got this. Remember: no computers, no code, no single right answer - just clear thinking and clear words. That is a skill you already have, and every tabletop makes it sharper.